How to remove dried concrete from a car paint
We want to get straight into the action, but before we begin, it has to be stated that concrete is corrosive to paintwork and will likely cause some etching to the surface of your paint. Once the concrete/cement is removed, there may need of paintwork correction, wet-sanding and polishing. However, you could be lucky, so we have our fingers crossed for you!
Do not attempt to "scape", "dig", "rub" or "peel" the cement off, you will damage your paintwork. Concrete and cement should only be removed with acid-based cleaners, which dissolve the lime. Always use the appropriate safety clothing.
Concrete Overspray Removal Guide
Following each stage with its simple steps will provide you with a safe removal technique to remove concrete from your car with minimal chance of causing further damage.
Stage 1: Determining Your Paint Type
If your car has been made in the last 25 years, then it probably has clear-over base paint, if your paintwork is metallic, then it definitely has clear over base, if so, then that clear coat is more resistant to any chemical damage caused by the concrete hardening or by any acid products that might be used to remove it.
Vintage Cars
Older cars may have been painted with a solid-base cellulose paint, or with a 2-Pack acrylic paint. These are far more prone to damage from acid and extra precautions will be needed. You can tell if your car was painted with a solid colour if when you polish it, colour comes off on your polishing cloth.
The good news is that vintage cars tend to be well looked after and so are usually well polished and maintained with a good coat of wax. Furthermore, these styles of paint tend to go on thick, so there is plenty to work with should damage need to be polished out.
However, if your vintage vehicle is precious to you, we would recommend seeking professional help.
Commercial Vehicles
Some commercial vehicles are still painted with a conventional paint system, the same as vintage cars, although this has become rare. But as some specialist commercial vehicles are kept on the road for many years because they are expensive to replace, this is worth noting. We would recommend seeking the help of a professional, or failing that, taking extra care when applying concrete removal product and in neutralizing them.
Stage 2: Determining the Level of Contamination
The level of contamination and what it is contaminated with can make a huge difference to how you approach the problem. Cement and concrete are not the same.
Light Cement Splatter
If the splatter is very fine, then there is a good chance it was watery, and so because the cement mix was weak and the contamination limited to small dots, you may be able to remove it with white vinegar. However, we would still recommend using a purpose made concrete remover instead.
The kind that come in a trigger spray and create a foam may well work for you.
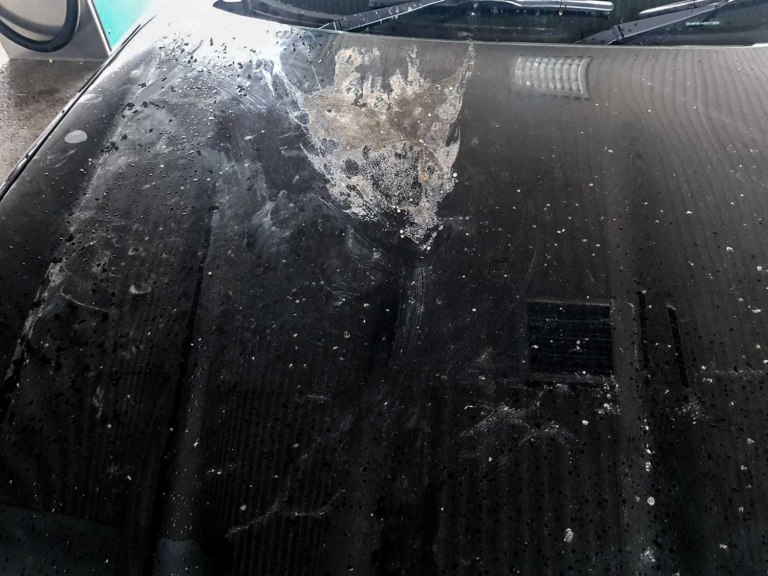
Very Fine Spray and Cement Powder Contamination
If the car is contaminated with a very fine spray of cement or covered with cement dust which has hardened, this might be best left to professionals as it is likely to have covered many different surfaces, including rubber and glass. This may be best treated with an acid bath, which is a process beyond the scope of a DIY article. However, it is possible to remove this yourself, but it may be slow and laborious.
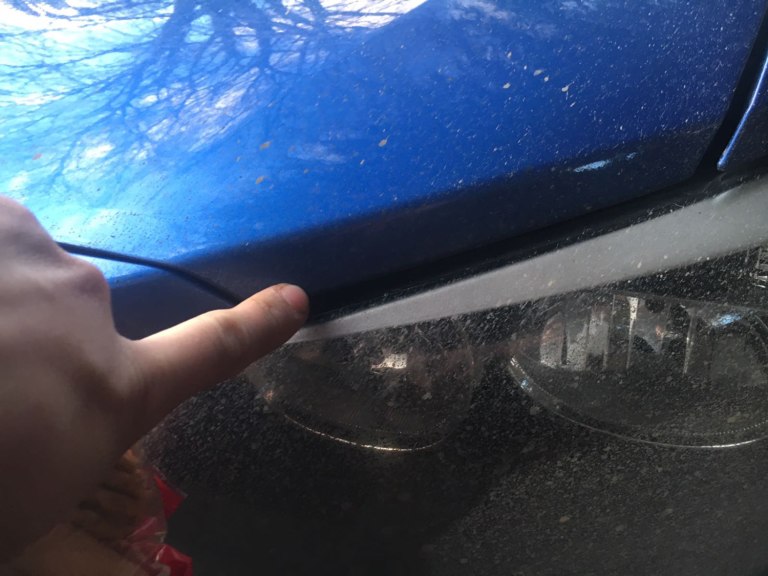
Larger Areas of Concrete
If you can see sand and grit in the splatter, then the upmost care needs to be taken during its removal to prevent scratches. We would recommend that you do not attempt to remove this with white vinegar as this would be so slow, that you are likely to get impatient and may do something you regret.
You will need a purposed made concrete remover to deal with any contamination beyond the finest watery splatter.
Important! - Concrete Mix
If possible, find out what kind of concrete contaminated your car. Many ready-mix concretes and commercial concretes now contain additives and may contain resins to make them waterproof. These resins can be highly resistant to acid and other chemicals (which is the point) and so will require a combination of acids and solvents to remove them, adding extra complexity to the process. If you attempt to remove concrete on your car, and the product has very little effect, this is probably the reason why. At this point, we would recommend seeking professional help and consider putting in an insurance claim.
Stage 3: Things you will need
Although many other guides will tell you to use white vinegar, we just don't think it's worth bothering with when concrete removers are readily available, inexpensive and far more effective. Here's our list of items you need to do the job properly, we will explain them as we go through the guide.
- Access to a pressure washer or hosepipe with a jet nozzle
- A bucket containing cold water
- TFR: Traffic Film Remover and/or PH Neutral Car Shampoo
- A trigger-spray bottle
- A selection of small paint brushes
- Water Spot Remover
- Concrete Remover/Dissolver
- A small container
- Eye Protection
- Nitrile Disposable Gloves
- Polyester Chemical Resistant Masking Tape (optional)
- Heavy Duty Plastic Sheeting
Stage 4: Wash the Vehicle
It is important to wash the vehicle to remove any dirt, mud and loose concrete. However, it is also important not to touch, rub or scrub the vehicle as any loose contamination on the vehicle will cause scratches to the paintwork.
We recommend mixing up your Traffic Film Remover or car shampoo and spraying it liberally over the car using a trigger spray, giving it a few minutes to work, and then rinsing it off all without physically touching the vehicle.
This is why we recommend a Traffic Film Remover, as these have a little bit of bite to them and have chemical cleaning ability. They are also slightly caustic, which will help neutralize the acid later on.
We also highly recommend using a pressure washer at this stage. If you don't have one or can't borrow one, then get yourself down to your local jet wash for this stage. It is unlikely that your local jet wash will want you hanging around all day with your bottles of concrete remover, hogging one of their cleaning bays, so it may be better to find alternative arrangements. A pressure washer really is the best thing for the job, but at a pinch, a hosepipe with a jet nozzle will do for later stages.
Feel free to give any areas of concrete a good blast with the pressure washer to remove any loose contamination, but don't overdo it. The pressure washers at your local jet wash are lower pressure with a higher volume of water, and are fairly safe, although they can still damage plastic, rubber and fabric if you get too close.
Pressure washers for home which run off a hosepipe use lower volumes of water at much higher pressure and can more easily cause damage, so take great care. As tempting as it may be, never get closer than about six inches.
Once you have applied the TRF or Car Shampoo, rinse it liberally. Please remember, we can't touch the vehicle, so do not attempt to dry it.
Stage 5: Removing the Concrete from Paintwork
I am sure you were paying attention in chemistry class and will remember that heat adds energy to any chemical reaction, and so it is best to carry out the next stage out of the sun, and preferably on a cooler day.
It is important to remember that concrete remover will dissolve the concrete your car is parked on. Tarmac is even worse, as the acids in concrete remover will bleach it, causing white stains. So park your car on plastic sheeting before carrying out the next stage.
We recommend that you work on one panel at a time, and on larger panels, one section at a time. If you have a lot to do, you will more than likely get impatient and ignore this advice, and you will most likely get away with it, but please follow this advice until you at least get a feel for it.
We would also recommend, if possible, trying it on a small area first to see if there are any adverse effects to the paintwork. If at any point the car has had any paintwork done to repair damage, start there, as this paint may be weaker than the factory finish. If there are any areas of the paintwork which are particularly dull or oxidized, you could also try there, as this paint surface is already damaged.
1. Safety First
Concrete Removers work by dissolving the lime and other minerals within concrete using acid. They are not particularly scary product, but the same care should be taken as when using a paint stripper, drain cleaner or oven cleaner, as they can potentially give you a burn. Paintwork can be repainted, skin is not so easily healed.
Always wear gloves to protect your hands. You will need eye protection as our method involves applying the product with a brush which can flick and spray. And keep the bucket of water and hosepipe handy so you can flush away any acid should you get it on you.
Use in a well-ventilated area, do not breathe in the fumes. Do not handle acid products near other chemicals, make sure children and pets are out of the way.
2. Masking Out
We do NOT recommend masking things out as a matter of course. Instead, we recommend using the minimal amount of product and not slopping it all over the place. If you put on too much, wipe/wash it off.
Normal masking tape is made of paper, which can soak up the product or harbour it along its edges, holding the acid for longer. It could do more harm than good.
If you do feel the need to mask more sensitive substrates such as rubber or plastic, then we recommend using a chemical resistant polyester masking tape. It's more expensive but will keep you out of trouble.
3. Making a Test
Firstly, and I cannot stress this enough, read the instructions on the product you have chosen as a concrete remover. Many will have dilution instructions, and we recommend that you start off with the weakest solution.
Because we know you will ask, we would recommend AutoSmart Congo because it is designed for cars, is low odour and is safer than some hydrochloric acid-based products. It's more expensive, but 'you pays yer money, you makes yer choice.
Other concrete removers sold in a can will also work. We have also heard good things about the kind you buy in a trigger spray, which foam. These will be slower and you won't see any fizz, they are more effective than white vinegar.
Use a sturdy container which won't dissolve and isn't easily knocked over, which you can easily hold in one hand. A glass pickle jar is ideal as it comes with a lid. We recommend you put some tape around it and label it with, "Danger! Acid" to help prevent accidents in the future.
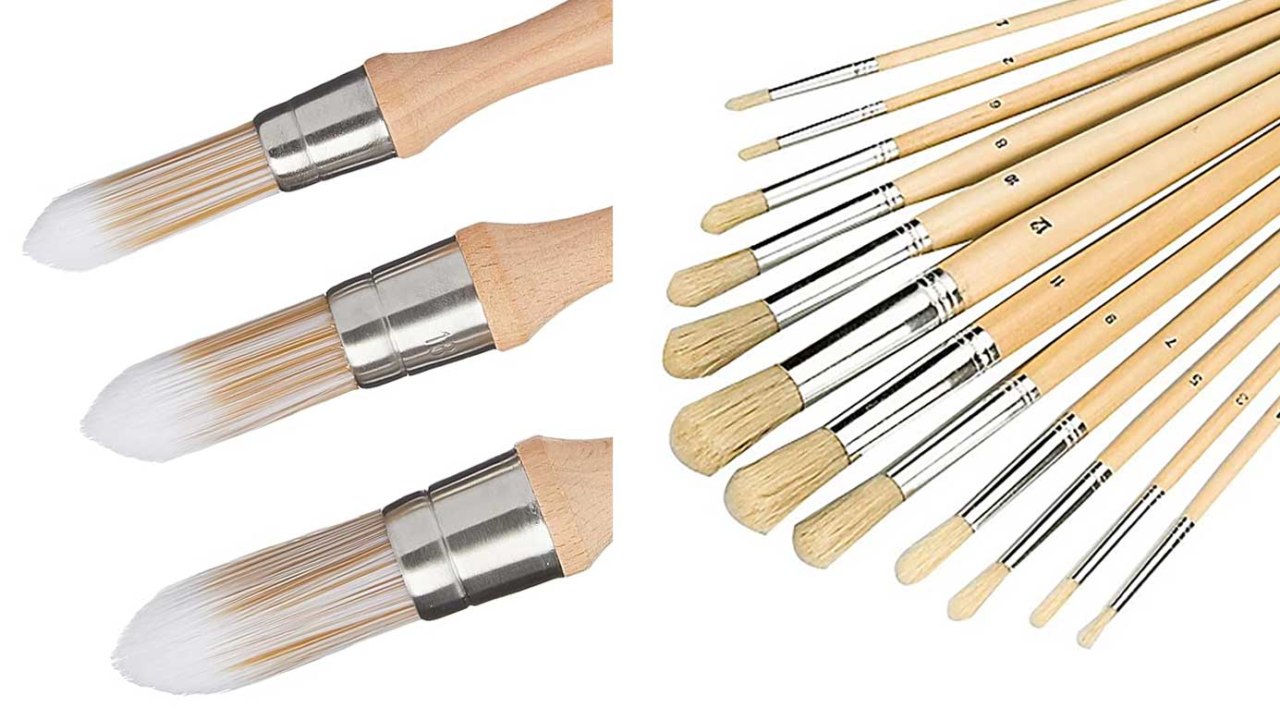
You will need some brushes and the cheap ones from a DIY centre will do, as they will get destroyed by the acid.
Chose an appropriate sized brush and dab it onto the concrete, trying to avoid the paintwork. You will get it on the paintwork, don't worry too much about it, but we are trying to dissolve the concrete, not the paint, so that's where were we should be aiming.
It should start to fizz as the acid reacts with the lime, this means it is working. Wait for it to stop fizzing and then flush it with water from the hosepipe or pressure washer. Don't expect it all to come off, you will likely have to repeat this several times.
Warning!
This can be a very slow process, and you may need to repeat it many times. There is a great danger that you get impatient and are tempted to wipe, rub, pick, or dig, at the concrete. Please keep in mind, that the worst damage we ever see from concrete contamination on cars, is always caused by attempts to remove it, not damage from the contamination it's self. Don't be the guy with the scratched car saying, "I wish I had listened!"
Also, acid is still as dangerous on the tenth time you use it as it was the first. Don't get complacent.
There's no fizz?
If the acid doesn't fizz, then test again using a stronger solution. If this does not work, then it may be the case that the concrete has additives which resist acid. You may need to seek the help of a professional. You may be able to carry on yourself, deploying solvents to break down the resins, but there is no easy answer to this. The solution is trial and error and falls well beyond the scope of this article.
Alternatively, it may be there is no fizz because you are using one of the safe formular concrete cleaners.
4. Rinse and Repeat
If there is no obvious effect on the car's paintwork, and the acid is fizzing and seems to be dissolving the concrete or cement, then carry on repeating the process. Apply acid, give it a few minutes until it stops fizzing, rinse it off, do it again.
Again, we recommend doing one panel at a time, and one area at a time on larger panels. You can work on one panel, rinse it off, then move onto another while that water dries off.
Here's why we suggest this. The acid is reacting with your paintwork too, but much more slowly than it does with the concrete, hence the fizz. But if you leave it on the car it will cause damage, so as soon as the fizzing stops, wash it all off and start again.
When to stop?
You could find that the concrete rinses off, and you would never have known it was on there. But it also could be the case that it leaves a dull mark. It may be slightly hazy, there may be a white or grey cloudiness, and, of course, there could be scratches. However, this is the point at which you stop. Adding more acid will not remove dull or cloudy marks and could worsen them. If it appears the concrete is physically removed from the paint, move onto the next stage.
5. Wash the car and neutralize the acid
That Traffic Film Remover we recommended is slightly caustic and will help neutralize any acid left on the car. Spray the whole car and let the TFR sit for a few minutes, then rinse it off. You can repeat the process a few times.
Alternatively, a PH neutral soap will also work with lots of rinsing.
Dealing with Plastic, Glass, Rubber and Fabric
Plastic, glass and rubber can be treated in much the same way as contamination on paintwork, however more care needs to be taken.
Plastic may be much more prone to etching from acid than your paintwork, on the other hand, it may be more resistant. The only way to find out is to try it. If the surface does become damaged by the process, some plastic parts can be very cheap to replace, which can be a better option than polishing them.
Concrete seems to bond particularly well to glass, but thankfully glass is resistant to acid.
Rubbers can be delicate, although the Congo we recommend is fine. They are however susceptible to pressure washers. Be extremely careful!
If concrete has ended up on a cabriolet roof, it's probably ruined, and there is a good chance you will need a replacement roof, so there really is nothing to lose by attempting to clean it. Just be aware, depending on what it's made of, the acid could eat right through it. So it would be best to try it on a very small area before proceeding.
Stage 6: Removing Cement/Concrete Stains and Scratches
Make no mistake, there is a high likelihood you will be left with at least some dull patches on your car's paintwork glass and plastic.
This is damage caused by the caustic reaction of the concrete setting, and by the acidic reaction to removing the concrete. There may also be some scratches caused when the concrete hit your car and by attempts to remove it.
1. Removing Stains
We recommend using a hard water spot remover. This is gentler on your paintwork and may remove the last of the lime deposits, especially on glass.
2. Removing Dull Spots
These dull spots are where a chemical reaction has etched the paintwork, rather like etched glass. The only solution is to polish them out. If they are very light, then hand polishing may do the trick, but with more severe etching, they may need to be machine polished, and may even require wet-sanding.
If you are not equipped and experienced enough to do this, then this is the time to go to a professional car detailer for help to finish the job. At least you saved a lot of money by not paying him for the laborious task of removing the concrete.
3. Removing Scratches
Like with the dull spots, these will need paintwork correction, and machine polishing out.
What not to do!
Do not lose patience. Concrete needs to be chemically dissolved, and this can take time. Don't rush the job, give yourself plenty of time, and remember, you can come back to it if you are frustrated.
Don't use a clay bar
Concrete is made with Sharp Sand, and they don't call it sharp for nothing. Any attempt to rub it off, will rub it into your paintwork, causing scratches. This is a type of damage worse than any etching caused by concrete contamination. For the same reason you would throw away a claybar if it dropped on the ground, you do not want concrete contaminating your claybar.
Don't poke and prod
Picking and poking it could get the job done faster, but your time is better spent applying some more concrete dissolver and going to grab a cup of tea. And there is far less chance of you causing damage to your paintwork.
Don't use a spatula
I don't know why people keep recommending you use a spatula to remove concrete, but don't use them, not plastic or wood nor wrapped in a cloth. No scraping, credit cards, chisels or blades should be used in the removal of concrete from delicate surfaces.
Don't wipe the concrete
In this guide, I have been careful to avoid using sponges, cloths or paper towels, even though they could be used in this process to carefully dab. The reason being is that the temptation is there to wipe. Even when the cement remover has done its job and the concrete comes loose, it is best to rinse it off, not wipe it off.
Don't listen to old wives tales
There's lots of advice out there that recommends all sorts of home remedies to remove concrete. Don't put WD-40 on them, you just waterproof them with oil. Salt solutions are bunk. And although white vinegar can sometimes work, it certainly won't work all the time, or even most of the time. We all have limited amounts of time and patients, so get the right stuff from the beginning.
Written by Danny Argent. Last updated 25/01/2024 12:14